Are you tired and frustrated with your meat's bland, dry end? You've found the perfect solution to your pork belly's dry and bland ends. This article will explain how to make the meat come apart like a charm. If you're in the market for a good brisket burger, you can try the famous Kansas City style.
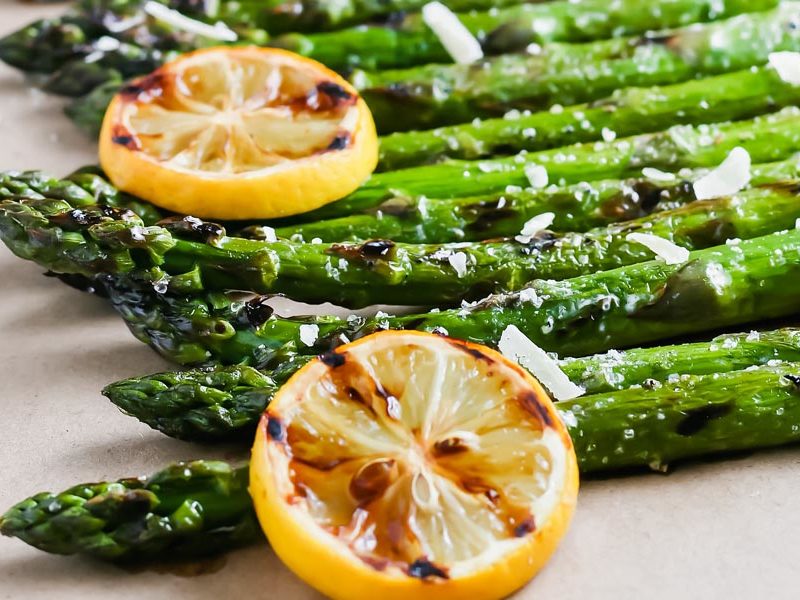
Pork belly burnt ends
The sweet, spicy, and almost candy-like flavor of smoked pork belly burnt ends is a result of smoking. It is best to smoke them for three to three and a half hours to reach an internal temperature of 195 to 203 degrees F. Once smoked, they should be glazed and rested for about 10 minutes before serving. You can also barbecue pork belly ends for a shorter time. So plan accordingly.
To begin, cut the pork belly into 1.5-inch-square pieces and brush with light olive oil and 1/4 teaspoon salt per pound. The ingredients list includes instructions on how to make your own rub. The rub can be applied while you are prepping your cooker. You might freeze the pork belly burned ends for a few moments before cooking.
Place the pork belly in an aluminium skillet before grilling. Cover the pork belly in the rub and cover it with butter pads. Allow the pork belly to smoke for at least two hours. Each half hour, check the internal temperature. You should continue cooking it for 30 minutes if it doesn't reach 190°F. Transfer the smoked pork belly into a serving dish.
Serve your pork belly burnt ends with the sauce. The sauce will impact the flavor and texture of the burned ends so make sure you're careful choosing the sauce. Maple bourbon sauce tastes great and is very sweet. Hot sauce brings out the heat. You can make your own BBQ sauce for a more smokey taste. You can make a Whole30 BBQ Sauce with Chipotle for Paleo.
Slow low temperatures are best for grilling pork belly burnt ends. This method will produce juicy, succulent pork belly burnt ends. Although patience is required, it is worth it. The entire process takes around two and a quarter hours. There is very little hand-off cooking required. This makes a great appetizer or snack for game days. But before you begin to prepare the pork belly charred ends, be sure to wash your hands with soapy water.
Brisket burnt ends
Brisket's charred ends are the tender, tasty part of it. It can also be prepared in many other ways. It's versatile and can be seasoned with any seasoning you choose. You can make the rub sweet, salty or spicy as you like. Rub the brisket first with dry spices. Bake at 250°F for approximately one hour.
Burnt ends are traditionally overcooked edges that were then trimmed by the cooks. The pieces were then made available to the public for free. In a 1970 Calvin Trillin book, he describes how the counterman at a Kansas City restaurant pulled the brisket's burned ends to the side while cutting the beef. The result was a tasty, tender treat perfect for barbecue fans.
How do you create a rub for brisket burned ends? Ingredients are the key to this recipe. The rub for brisket ends, while it is a traditional recipe, can be easily modified to suit your taste. First, make sure that the beef you use is in excellent condition. You'll have to cook it for longer or buy new beef brisket. The best cuts to eat are the burnt ends.
A brisket can be purchased at a butcher's or grocery store. It is simple to trim a brisket, but it is important that you remove all fat and skin. Then, combine the rub ingredients in a bowl. You should remove all fiber as the fat will absorb it. This process should be repeated if necessary. The perfect barbecue brisket end will be juicy, sticky, and saucy.
Jeffs' original recipe can be used to make a rub that will cook brisket ends. You can also use an online recipe. You can purchase Jeff's rub and mix it with the meat, or try the Poor Man's recipe. The rub is designed to cook the meat to 165° internal. It is then placed in an aluminum tray and covered with bourbon BBQ sauce. The meat is cooked until it reaches the desired internal temperatures.
Perfect cut for brisket burnt ends
Brisket's burned ends are the best choice for BBQ. These fattened bits pair perfectly with seasonal corn on a cob. They are succulent, smoky and deliciously flavored. The marbling is just right and the flavor is elevated by smoke and heat. There are many types of BBQ-ed Brisket.
There are two ways to make brisket perfect. Slice the brisket lengthwise into strips about 3-4 inches in diameter and 1/4-inch thick. You should use a long, straight knife when slicing. Cuts should be straight with a consistent fat line on the bottom. Every slice should have a smokey ring. For the perfect cut, you should also trim the brisket’s ends.
The next step is to decide what side of the brisket you will serve the burnt ends on. Although most people will serve these as starters, you can also make them a main meal by pairing them with southern staples like collard greens or potato salad. This is the best thing about barbecued ends. They can be reheated or served cold. They will be something you'll want to try!
You will need to cook a brisket to 165 degrees Fahrenheit before you can carve it. You want the brisket to be tender and moist. You can use a long knife to cut the brisket's point and flat muscles. After cutting the point you will need to place it on a tray topped with honey or sauce. Once the point is cooked, you can remove the cubes from the pan and place them in the smoker for a few hours. Then, you can check the edges for any signs of burntness using a meat thermometer (or a knife) just as you would with a steak.
There is no better cut than the point for perfect brisket. The bark should be the dominant part of this cut. These ends are delicious for their crunchiness. It also pairs well with any sauce, or cooking method. Kansas City restaurants can offer you burnt brisket without charge.
Kansas City Style brisket-burnt ends
There are a few steps that you can follow whether you want to make a KC-style barbecue or a homemade brisket. Start by heating the smoker to 250 degrees Fahrenheit. Next, add the wood per the manufacturer's instructions. To create a humid environment, place a bowl of water in the smoker. Water helps keep meat moistened by helping the smoke stick to it.
The "burnt ending" of a brisket is often called the "point." In fact, the meat isn’t really burned. The term "burnt end" comes from the "bark," a combination of spices and rendered fat, that turns dark brown in smoke. It has a strong flavor and is not burned. You don't have to buy a whole brisket. The point can be used and cooked separately. You should trim the point the night before cooking.
Brisket burnt end sandwiches are irresistible, as can anyone who has tried them. Many end up on a cutting board. They're a popular dish on the barbecue menu. It's no surprise that burnt ends are irresistible. People in line will reach for the ends while they wait for their order. The good news is that this situation does not have to last forever. There is a simple solution.
Texas has always been the home of brisket. However, in Kansas City, this particular cut was invented. This is why brisket roasted ends in Kansas City have become a popular topic. These pieces are perfect for any type of barbecue.
You will need to first separate the flat from the point. While most people can't find the point, this doesn't mean you shouldn't try. Skip this step if you are able to find the point. Slice the brisket lengthwise into halves. After that, make thin slices of the flat. The flat portion can be cut easily and the point can be used for sandwich making.
FAQ
What skills is required to attend culinary school
A chef's job requires you to be able cook well under pressure and understand food safety regulations. To learn how to cook, you should take cooking classes at your local high school or community college. Once you have mastered the basics of cooking, you will need to find work in a restaurant and catering company.
Is there any difference between a chef or a cook.
A chef prepares meals for others. A cook prepares food for his or her own consumption. While both jobs involve preparing food, a chef works directly with customers. This means they may have to decide what to serve guests based on their preferences. A cook doesn't need to interact with clients. Instead, they ensure that the food tastes delicious before they serve it to others.
What should a beginner cook first?
An easy dish to start with is pasta, rice, or soup. You can learn how to cook by looking at a cookbook or watching a YouTube video. It's much more fun to cook with someone you know. Enjoy cooking with your family, friends, or both.
Can I learn to cook alongside my kids?
Yes! Yes, kids love to help in kitchen. It's an enjoyable activity that teaches responsibility and teamwork. From washing vegetables to chopping onion, children can help. Your children will be more comfortable helping you cook if you teach them safe techniques for handling knives.
What are the basic skills of cooking?
Basic cooking skills include the ability to read recipes and measure ingredients. These skills are essential if you wish to cook well for yourself. Cooking is also a great way to save money since you don't have to eat out all the time.
How Long Does it Take to Become a Chef? What's the average career path for a chef?
Five years is required to become a professional chef. During this time, you will study basic cooking techniques and gain experience working as a kitchen assistant. After you've completed your training you can apply to be a line cook or sous chef. The annual average salary of a chef is $25,000-$60,000.
Statistics
- You'll be amazed that over 90% of CIA students receive scholarships and grants to finish their culinary studies. (ischoolconnect.com)
- under 10 Kids have been taught that there is special food just for them, and Fiese says that 10 percent of kids will throw a tantrum if they don't get the food they want. (washingtonpost.com)
- According to the BLS, chefs earn $58,740 a year. (learnhowtobecome.org)
External Links
How To
How to make a perfect eggroll
Omelets are my favorite breakfast dish. But how do you make them perfectly? Many different recipes and methods have failed to work for me. Today, I'd like to share some tips with you in order to make delicious and fluffy omelets every day.
Before we start making omelets, let's remember that eggs are temperamental. It is important that eggs are fresh from an organic market and kept cool until used. The yolks and whites will not form properly if they aren't kept cold enough. This can make your omelets look bizarrely colored. If you intend to cook your eggs immediately, it's best to use room-temperature egg.
Another tip is to separate the egg before adding it to the pan. Because this could cause your omelet to become curdled, you don't want any yolk to be mixed with any white.
If you add the egg directly onto the stovetop, you might end up burning the bottom part of the egg, which would ruin the texture of your omelet. Instead, put the egg in the microwave for 10 seconds before putting it into the pan. The microwave heat cooks the eggs just right without overcooking them.
Next, let’s talk about mixing the egg. When mixing eggs, it is important to thoroughly beat them. To do this, take the bowl from the mixer and flip it upside-down. Then shake the bowl vigorously. This will whip the air around the bowl and mix the egg well.
The fun part begins - you need to pour the milk into your mixture. The first step is to pour half of the milk in the beaten eggs. Next, fold the eggs into the remaining milk. Do not worry if you see streaks of egg; they will disappear when the omelet is flipped.
After you have folded the eggs, heat the oil in a pan over medium heat. Once the oil has started to sizzle, turn the heat down to low. Once the oil starts getting hot, add 1/4 cup of butter to the pan and swirl it around to coat the entire surface of the pan. Next, carefully open the lid and sprinkle salt into your pan. A pinch of salt will prevent your omelet from sticking in the pan.
Cover the pan once the omelet is formed and allow it to cool completely. Flip the omelet by using a spatula. Cook the opposite side for another minute. Serve immediately after removing the omelet from its pan.
This recipe works best using whole milk. Skimmed milk is also possible.